
Data Source Configuration
On this page
- 4.5 Data Source Configuration
- 4.5.1 Supported Data Sources
- 4.5.2 Creating a Database
- 4.5.3 Configuring a Database Connection
- Local Files
- Server Databases
- ODBC
- Connection Changes and Saved Settings
- 4.5.4 Selecting Tables and Fields
- Tables, Keys, and Relationships
- Tables Versus Outputs
- What One Row Represents
- 4.5.5 Query Designer
- Entering and Understanding the Workspace
- Managing Tables
- First Join: Department to Organization ID
- Second Join: Personnel ID to Photo Owner
- INNER, LEFT, and RIGHT Joins
- Correcting Relationships
- Outputs and Aliases
- Filters
- Sorting
- Save Query and Return
- Restoring a Diagram from SQL
- 4.5.6 SQL and Preview
- Partial Preview
- Column Order and Completion
- 4.5.7 Image Fields and Photo Sources
- 4.5.8 Common Data Configuration Problems
4.5 Data Source Configuration
Data configuration underpins dynamic objects, data-entry components, and reports. A usable configuration needs the correct connection, confirmed relationships, stable outputs, and a verified record scope.
For a new project, create a standard SQLite database first. For an existing business database, obtain connection and schema information from its administrator; do not practice creating tables in production. Both routes then select tables and fields.
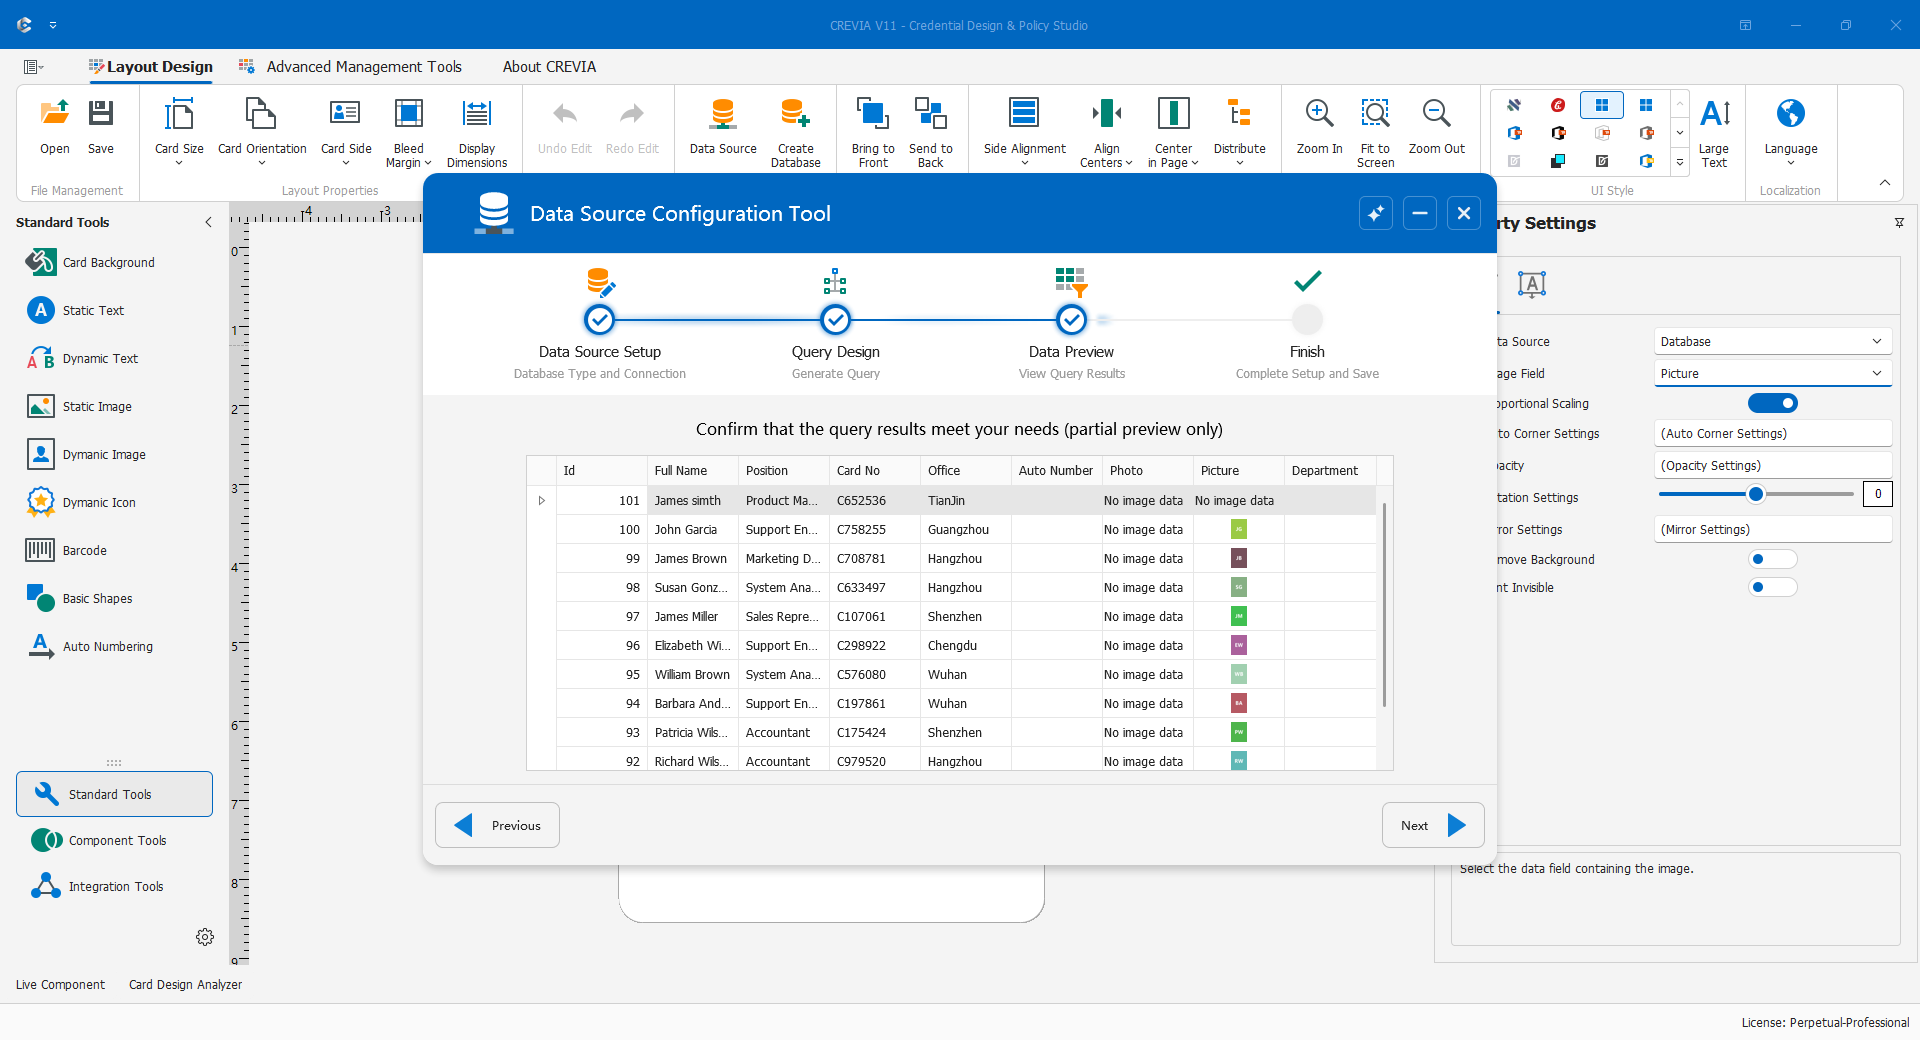
The wizard has four stages: Data Source Settings, Query Design, Data Display, and Finish. Test access, build or enter SQL, inspect results, and confirm the settings. Then save or publish the entire layout: completing the wizard alone does not update the delivery file.
Before starting, identify the database location, account, personnel table, primary key, photo relationship, and department relationship. A visual designer cannot establish business relationships for you. A readable query is not necessarily editable in COC; validate keys, relationships, and write permissions separately.
4.5.1 Supported Data Sources
| Source | Configuration and limitations |
|---|---|
| SQLite | Local file; no separate database server. Requires correct file/directory permissions and backup. Do not assume a shared file supports frequent concurrent writes. |
| Access | File with a compatible provider and application architecture. Copying it to another computer does not install the provider. |
| Excel | Workbook integration; generated templates do not create photo tables. Not the recommended starting point for sustained personnel/photo management. |
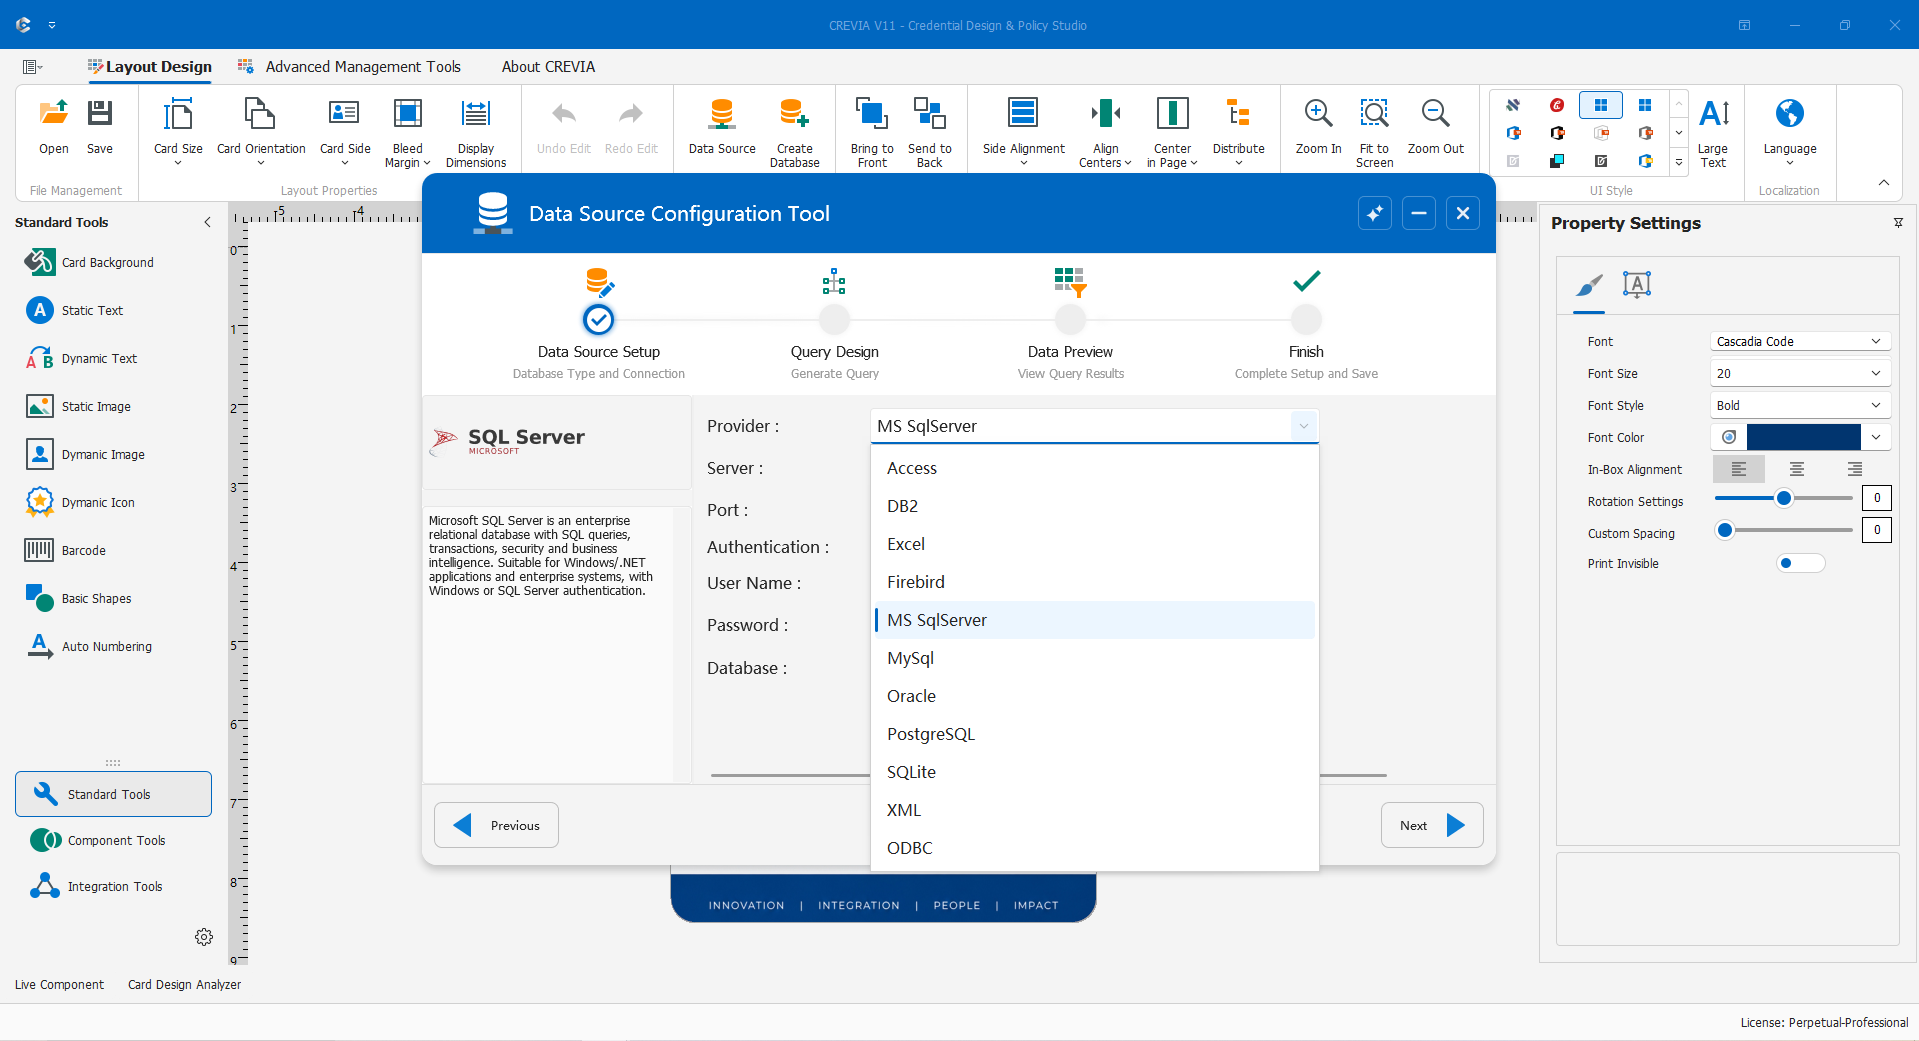
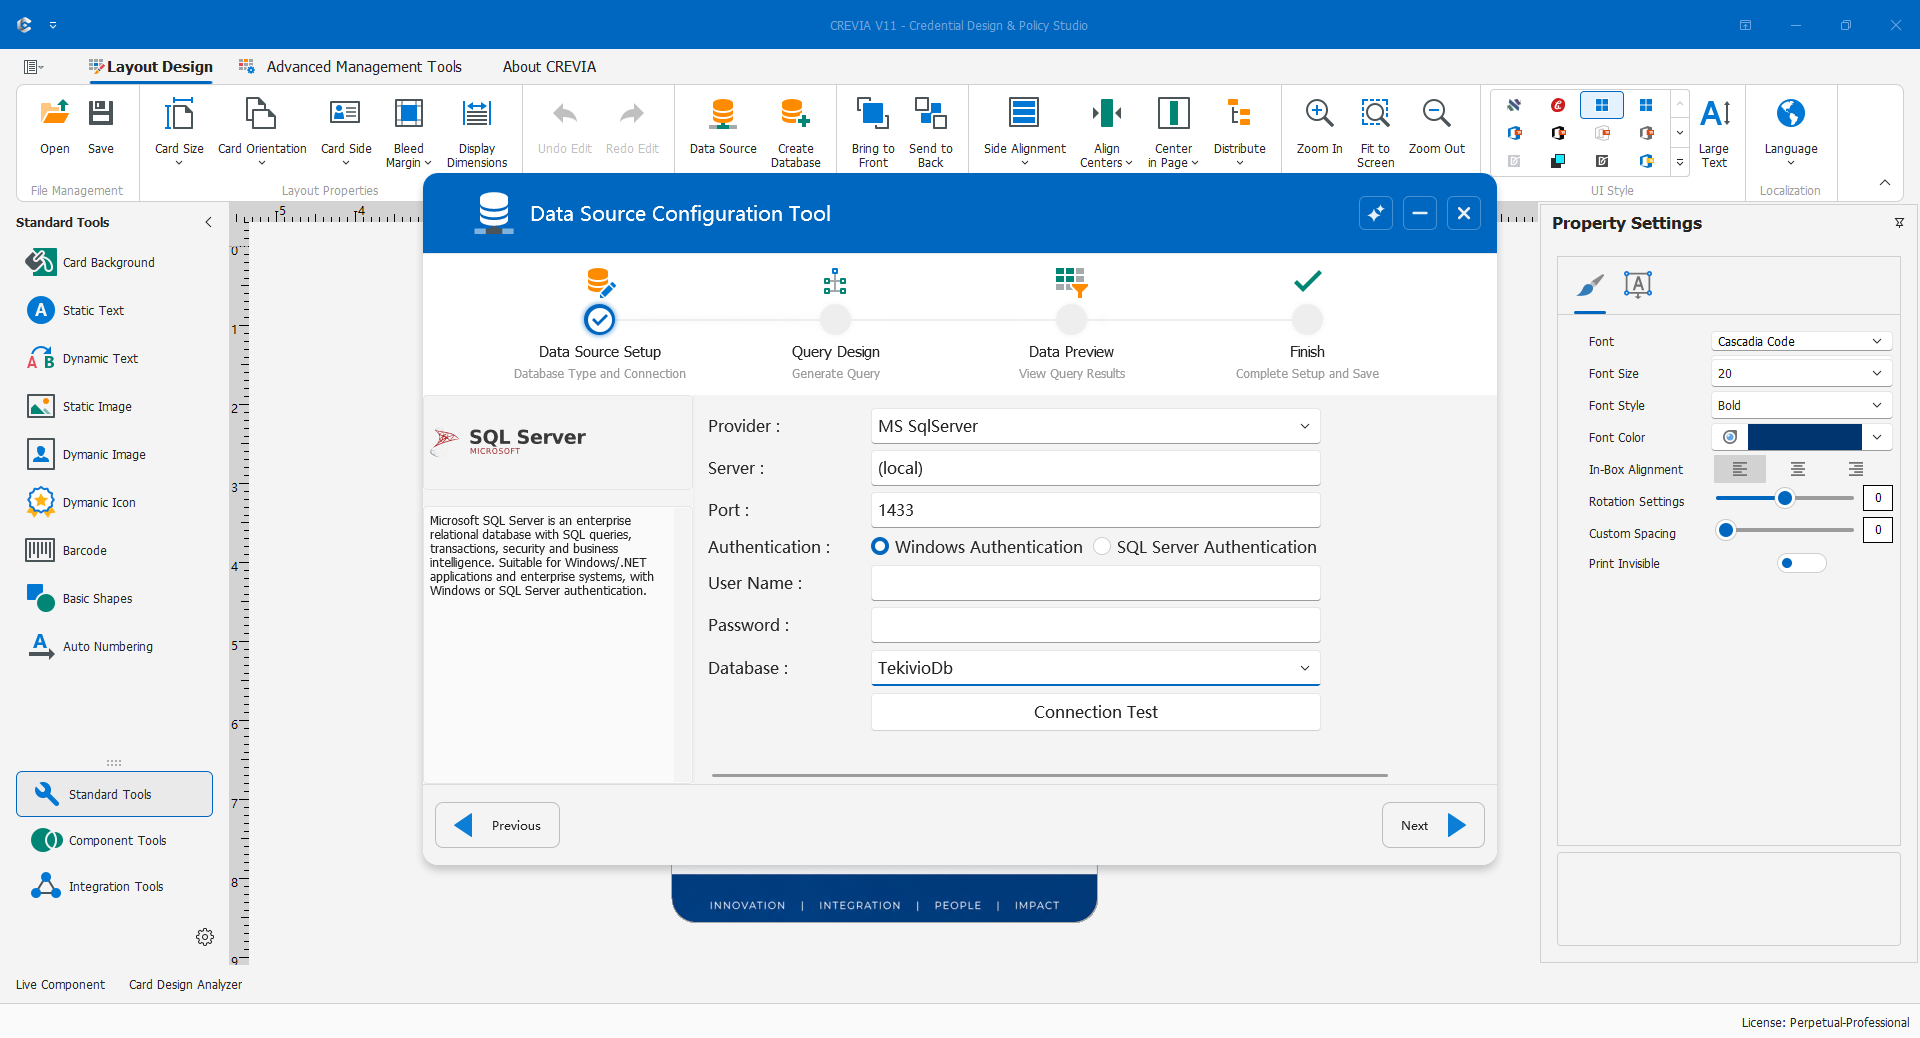
| MS SqlServer | Host/instance, target database, and Windows or SQL Server authentication. Windows identities may differ between workstations. |
| MySql / PostgreSQL | Host, port, database, and credentials. Enumeration helps selection but does not identify the correct project automatically. |
| Oracle | Service Name, not a local path. ORCL and XEPDB1 are examples, not universal defaults. |
| DB2 | Administrator-supplied host, port, database name, and credentials; do not require an enumerated database list. |
| Firebird | Server connection with a server-recognized database path or alias, not the client computer's local path. |
| XML / XMLDataSet | Appropriate XML or XSD source and validated structure; arbitrary XML is not automatically a complete personnel database. |
| ODBC | Matching-architecture driver and DSN or connection string. SQL, metadata, and write capabilities depend on the actual driver/database. |
Check licensing and user permissions if the entry point is unavailable; do not modify configuration files to bypass restrictions.
For an initial single-machine database, SQLite is convenient. Existing Access data may be retained if its environment is suitable. For centralized multi-user work, choose a server database according to workload, backup, and maintenance requirements. A shared folder does not turn a local database into a server system.
Keep identifiers as text from the source: converting 125 to text cannot reconstruct 000125. Prepare file locations and permissions, server host/port/database or service and authentication, or a correctly configured DSN. Also document real keys and how card/photo history is selected. Support materials must omit passwords and complete connection strings.
4.5.2 Creating a Database
Use a separate writable Database folder, preferably empty for the first exercise. Back it up independently of layout versions. Automatic creation requires the installation's base templates; repair the installation if they are missing.
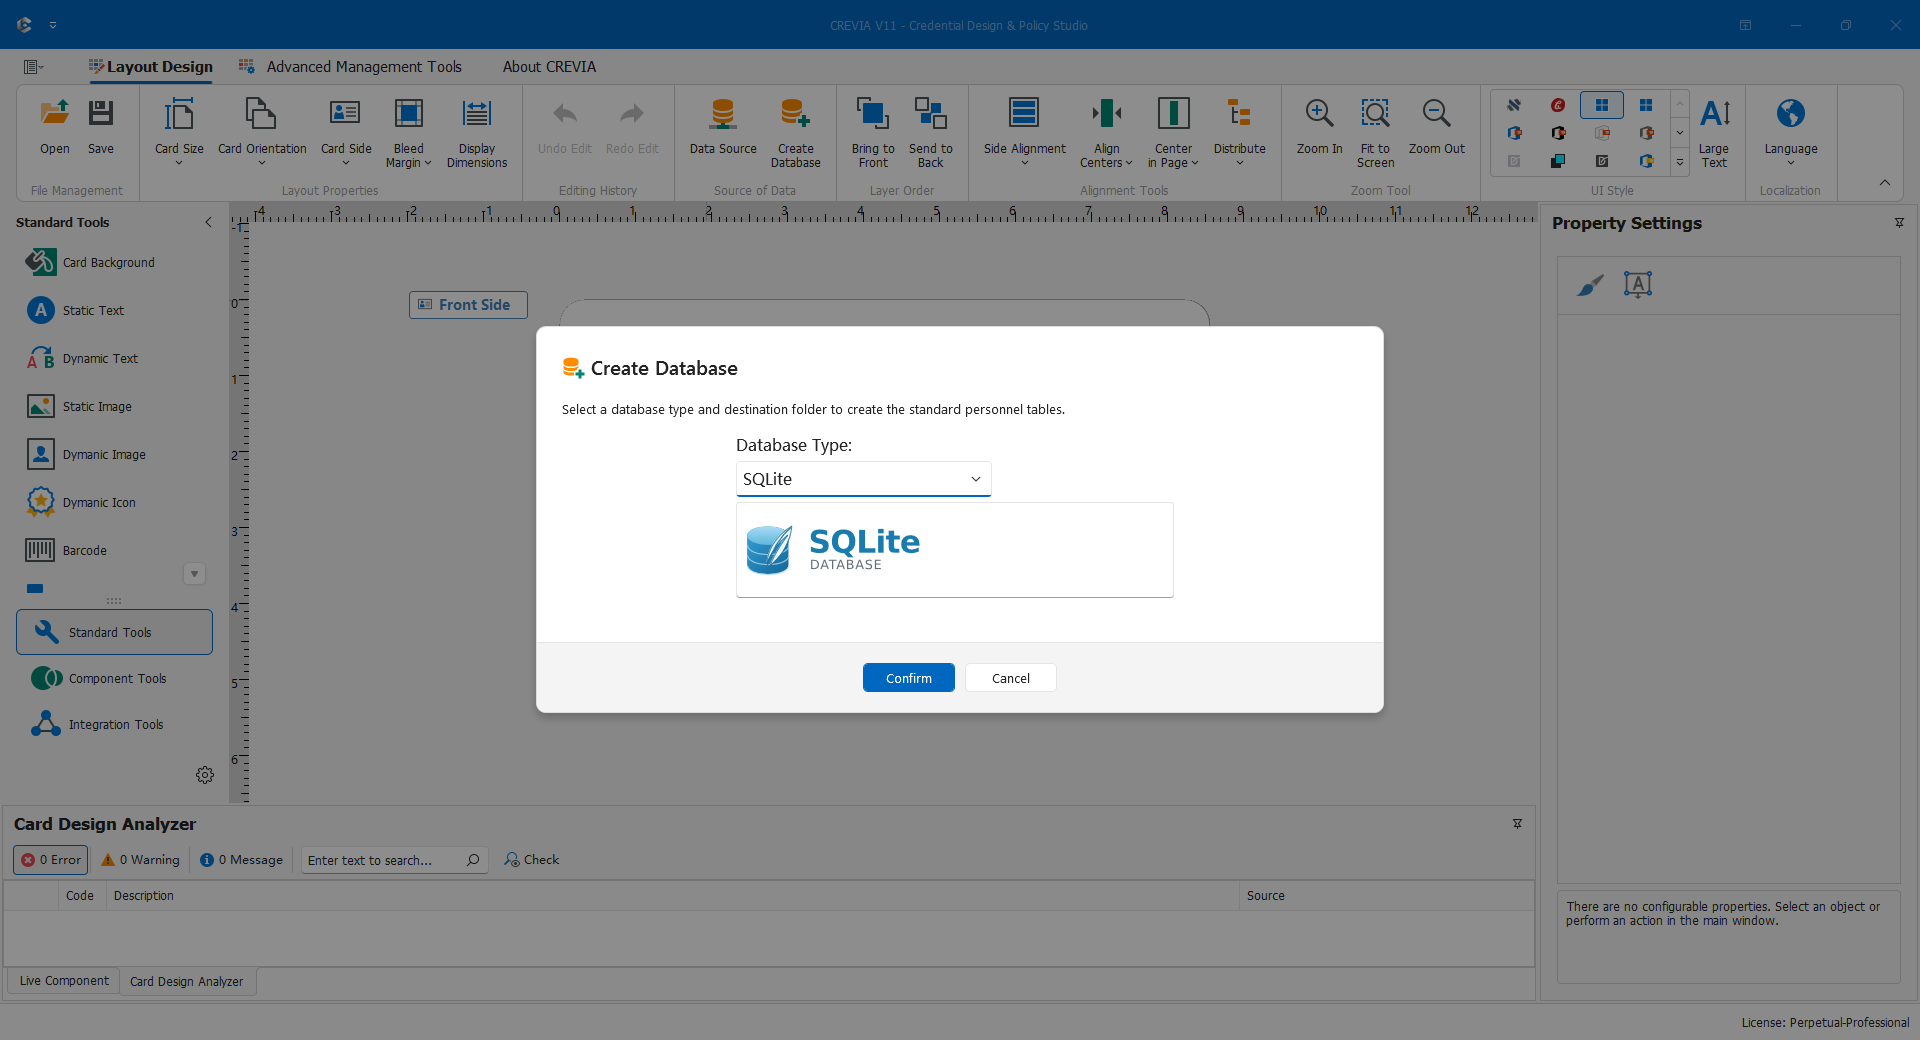
- Open Create Database, choose SQLite, and confirm. Access and Excel likewise require selecting their actual type first.
- In the subsequent folder picker, choose the destination. This is a folder selection, not database-name entry.
- Wait while the template is copied and tables are created; do not move or replace the target files during processing.
- After success, check the generated file. Its name follows the current language and the system retains its path and connection details.
- Inspect the structure in the data tool and configure the query. If an unknown same-name file exists, use another empty folder instead of overwriting it.
Creation supplies structure, not populated personnel data. Zero rows in a new database may be normal. PersonnelManagementTemplate.xml, if present, is a structure template rather than a personnel spreadsheet. Bind dynamic objects separately and add demonstration records later. Excel creation omits the photo table.
4.5.3 Configuring a Database Connection
Connections define location and access; queries define what is read. Validate connectivity and structure before multi-table SQL.
The provider determines visible inputs. Files primarily need a path, server databases need host/database/port/authentication, and ODBC uses DSN or a connection string. Recheck inputs after switching providers. Database accounts and CDPS users are different identities.
Local Files
Select the provider, browse to the actual database, test the connection, then verify the expected tables before continuing. After automatic creation, ensure the selected file is not an older same-name database. An empty new database can still expose valid structure. For Access, supply a database password if required. For Excel, select the enumerated worksheet rather than assuming a demonstration sheet name applies.
Server Databases
- Select the real provider and enter the host and actual listening port.
- Supply the database or Service Name. If enumeration is supported but empty, check network, authentication, and listing permissions rather than recreating a business database.
- Use the agreed authentication method; SQL Server may use Windows or SQL Server authentication.
- Test and confirm the target and visible tables.
- Repeat in the actual COC workstation environment before deployment.
Use administrator-provided Oracle service and DB2 database names. PostgreSQL enumeration needs valid host/credentials; listed databases are not all necessarily part of the project.
ODBC
Choose a configured DSN or enter the approved connection string. Recheck synchronized DSN/string settings after changes. Driver and DSN architecture must match the program. Keep connection strings restricted because they may contain credentials and internal addresses. Migration requires rechecking driver, DSN, credentials, and paths; copying a layout does not reproduce the environment.
Connection Changes and Saved Settings
Changing provider, file, host, database, port, or authentication invalidates the earlier test. Test again; the designer also prepares the connection from current inputs. If the current connection differs from saved configuration, an old query may not load, protecting against use on the wrong database. Restore or rebuild the correct query rather than selecting an incorrect connection to retain its text.
Use least-privilege accounts. A design account needing read access does not need unrelated write access. Copying a layout does not copy a D: drive or shared permissions.
4.5.4 Selecting Tables and Fields
Tables, Keys, and Relationships
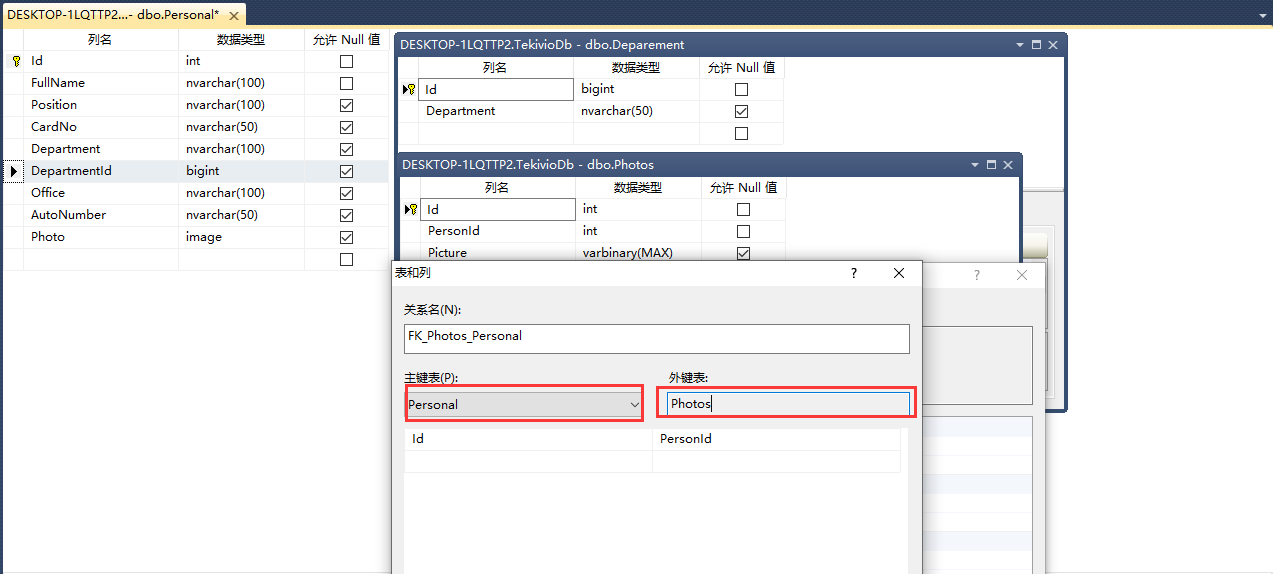
A table stores an entity, a field stores an item, and a primary key uniquely identifies a row. Foreign keys associate entities. For example, a personnel DepartmentID holds an organization's ID, while the displayed department name comes from its organization record.
For explanation only, consider Employees(ID, FullName, DepartmentID, CardNumber), Organizations(ID, OrganizationName), and EmployeePhotos(EmployeeID, Photo). Join Employees.DepartmentID = Organizations.ID and Employees.ID = EmployeePhotos.EmployeeID. The actual generated template may use other, language-dependent names. Two fields named ID are not necessarily related, and names are not general-purpose keys.
Tables Versus Outputs
Select participating tables in the query step, then open the designer. Without existing SQL, selected tables initialize its windows; with SQL, restoration of that statement takes priority. Check the actual diagram.
Adding a table makes it available, selecting Output determines result columns, and joins determine record correspondence. These are three independent checks.
Output the personnel key, name, number, organization name, and photo, plus any operationally required keys. A department ID may participate in a join without being printed. Give duplicate field names unique, stable output aliases. Aliases rename query outputs, not original database columns.
What One Row Represents
One organization may have many employees; one person may have historical cards or photos. Specify current versus historical records before querying. Two cards and three photos can create multiple combinations. Resolve relationships and validity rules with the administrator; do not delete personnel or apply arbitrary deduplication to disguise them.
4.5.5 Query Designer
The visual designer uses table windows and equality joins, plus outputs, aliases, filters, and sorting, to generate SQL. Confirm business relationships first.
Entering and Understanding the Workspace
Test the connection, enter Query Design, preserve existing SQL, and open the designer. If connection setup is required, return to the first page rather than repeatedly adding tables to an empty canvas.
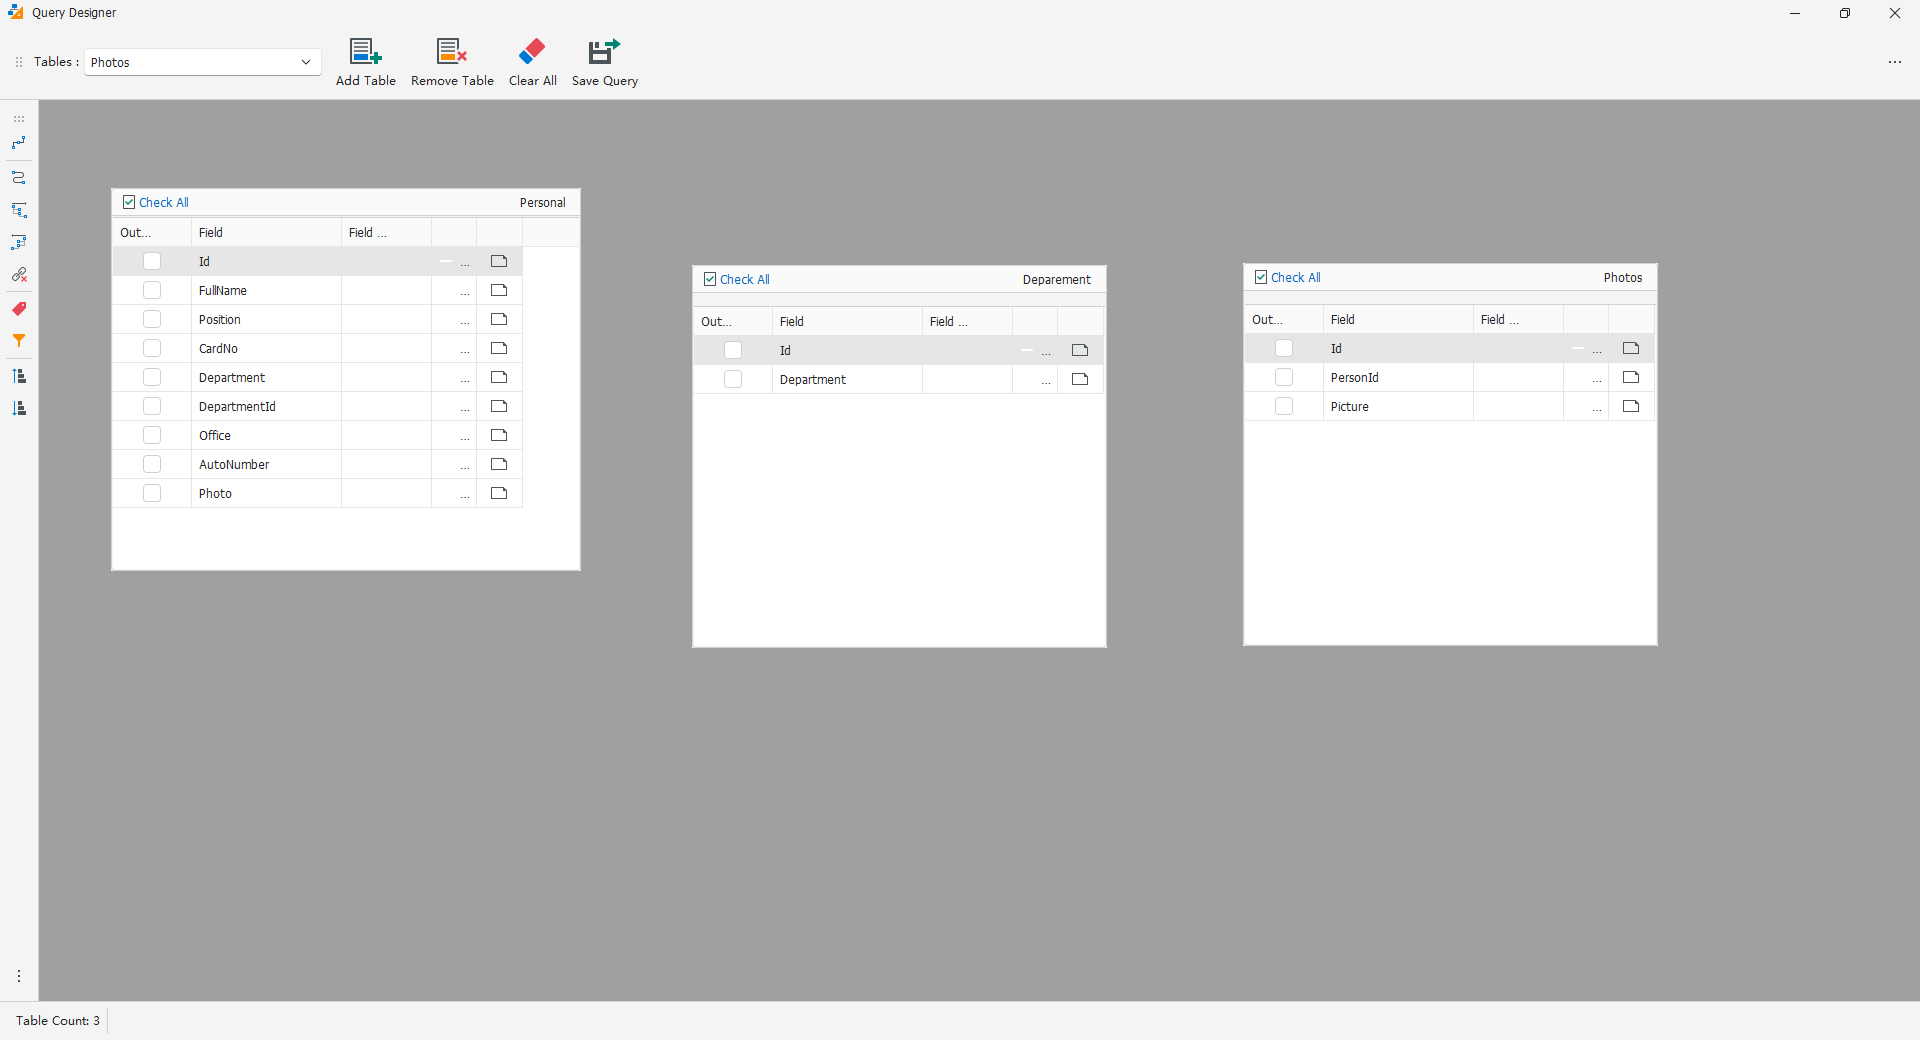
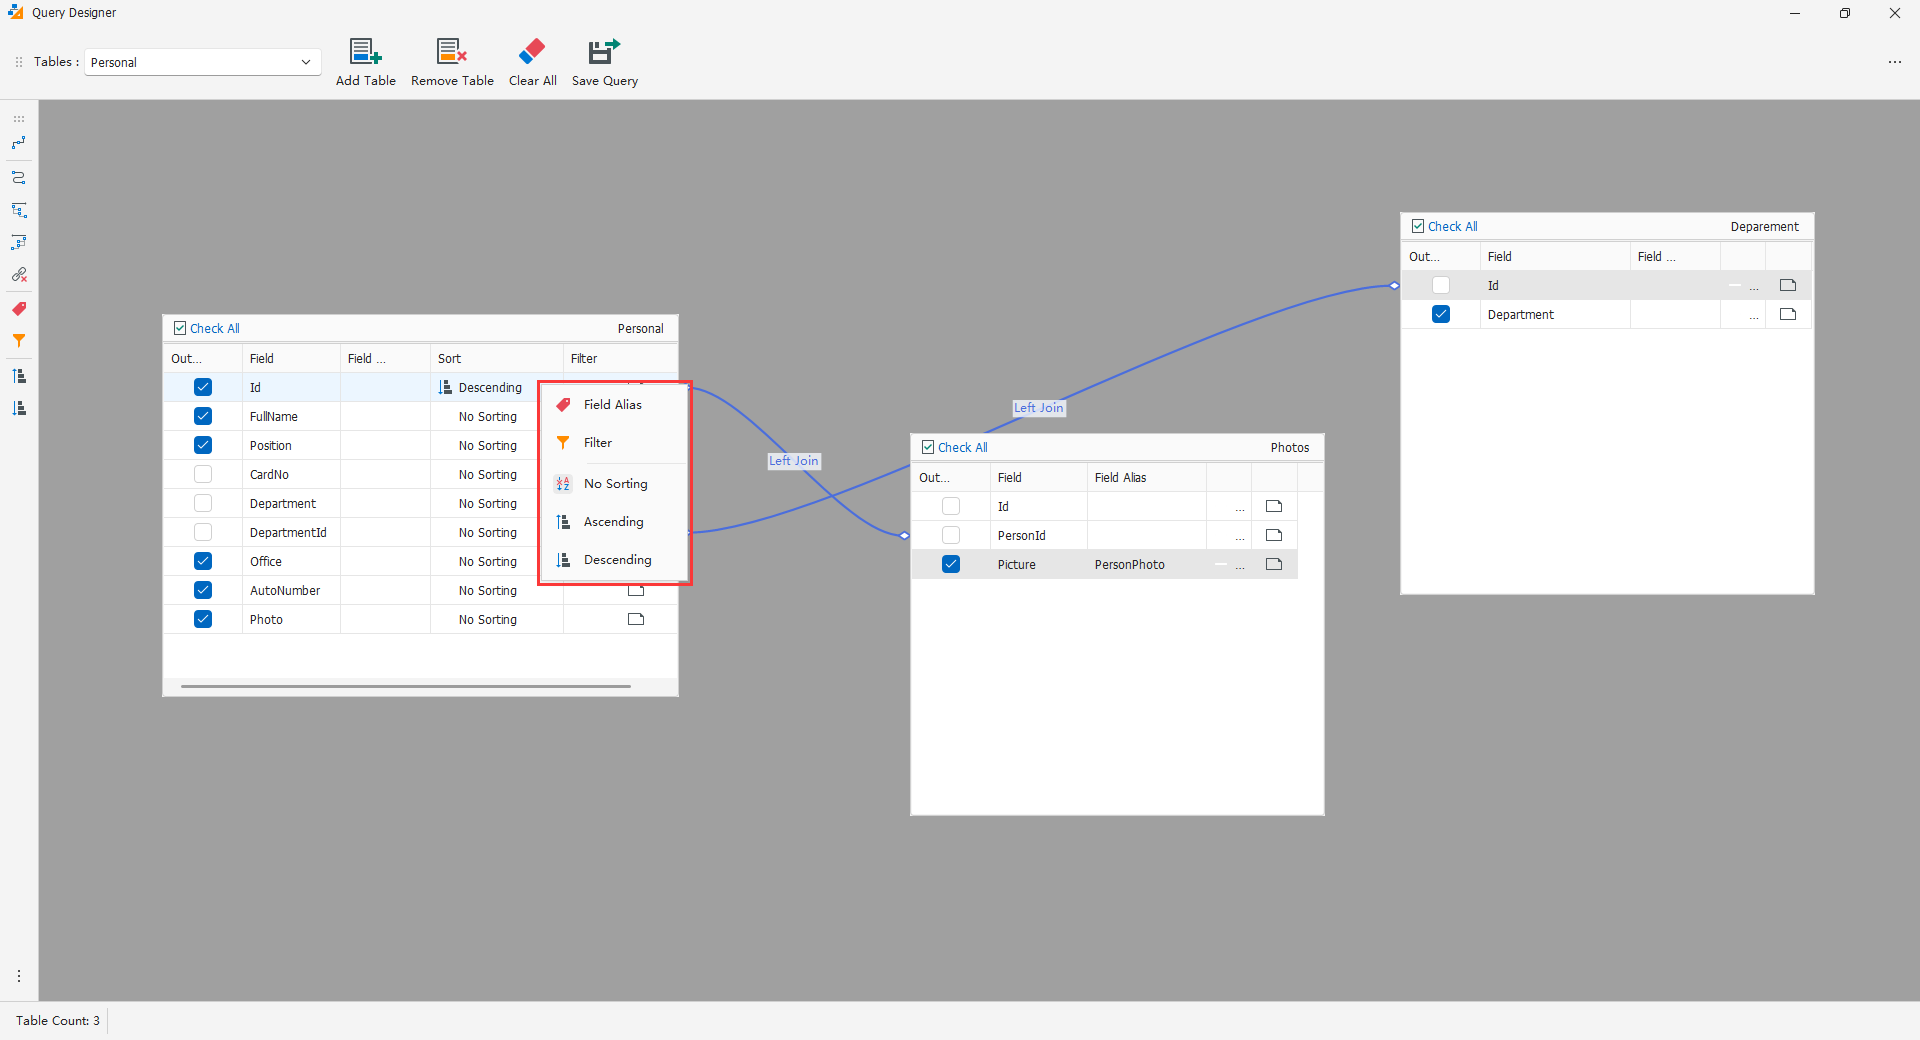
The toolbar manages tables and saves queries. Table fields commonly show Output, Field Name, Alias, Sort, and Filter. A field's context menu edits its alias/filter/sort; a line's context menu changes join type or disconnects it.
Managing Tables
Choose a table and Add Table. If structure cannot load, fix the connection first. Move windows to avoid crossing lines and scroll or resize as needed. Moving a window does not move database records.
Select a table before Remove Table. Removal affects the design, outputs, and related joins, not the database table. Repeated additions create numbered table aliases for different roles; remove accidental duplicates. Clear Tables clears the entire design, not a data refresh, so preserve SQL first.
First Join: Department to Organization ID
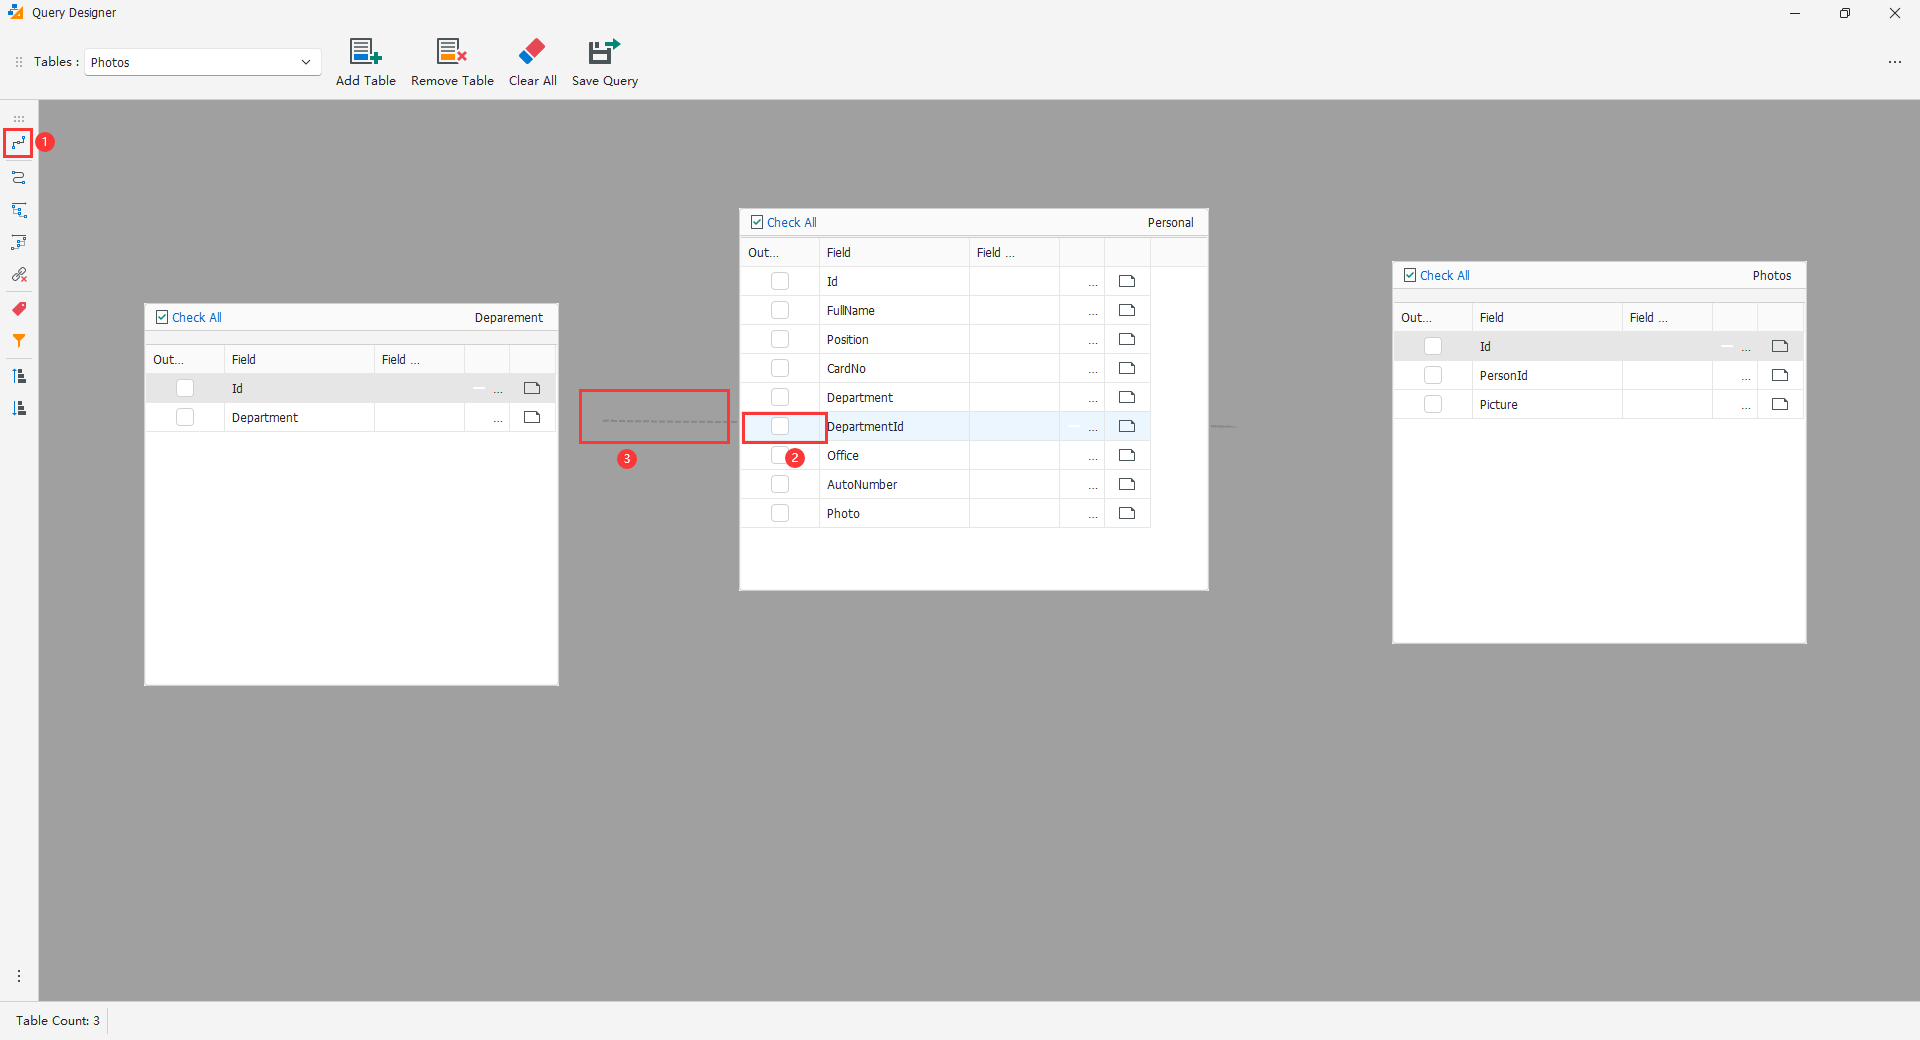
The current interaction is enable the Table Join Tool, then click two field names, not drag-and-drop. Click field names, not Output checkboxes.
- Confirm compatible stored values: the employee department field holds the organization's ID.
- Enable the join tool.
- Click the first field, such as
Employees.DepartmentID; a temporary line follows the pointer. - Click the second field, such as
Organizations.ID. - Confirm a permanent line. The new join defaults to INNER JOIN and the tool exits after completing it.
If the start is wrong, click that same field again to cancel it, or toggle the tool and restart. A moving temporary line is not a completed relationship.
Second Join: Personnel ID to Photo Owner
Enable the tool again, click Employees.ID, then EmployeePhotos.EmployeeID. Re-enable it for every relationship. Use the photo's personnel foreign key, not the photo record's own primary key. A join does not automatically select names or images for output.
INNER, LEFT, and RIGHT Joins
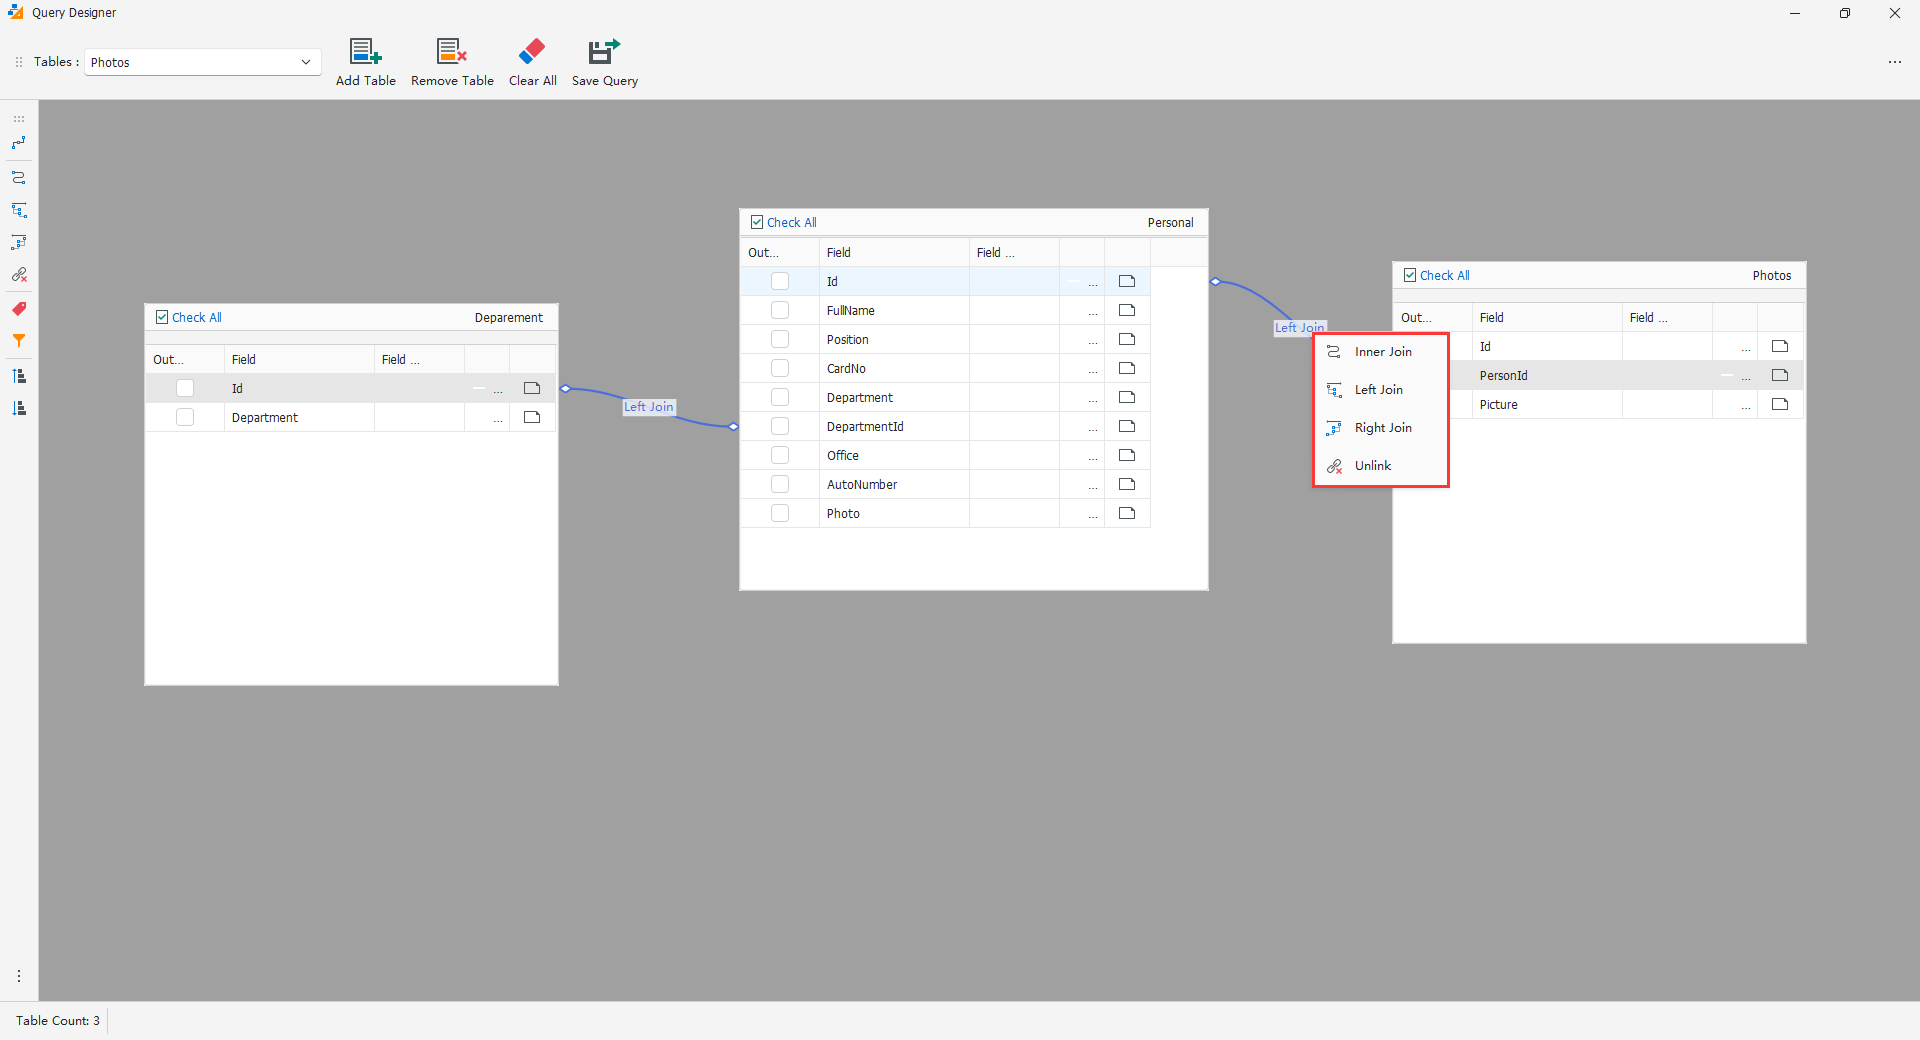
Right-click a permanent line to select join type or disconnect it; left-clicking selects the relationship. The command applies to that line only.
- INNER JOIN keeps matching combinations only; people without a photo may disappear.
- LEFT JOIN keeps SQL's left side and returns NULL for missing right-side values.
- RIGHT JOIN keeps SQL's right side; verify actual SQL ordering before choosing it.
The canvas arrangement does not set the main table. The designer determines the generated FROM table; adding or clicking a table first, or moving it left, does not guarantee it becomes the base. Check FROM, JOIN direction, and preview. To retain a person without a photo, use a known missing-photo example to verify the correct preservation side. Merely choosing "Left Join" is insufficient.
Correcting Relationships
Disconnect the incorrect line and rebuild it; there is no need to clear everything. Disconnecting changes the query, not stored records or database constraints. Verify an actual relationship path for every participating table. Complex roles or composite conditions need administrator review.
Outputs and Aliases
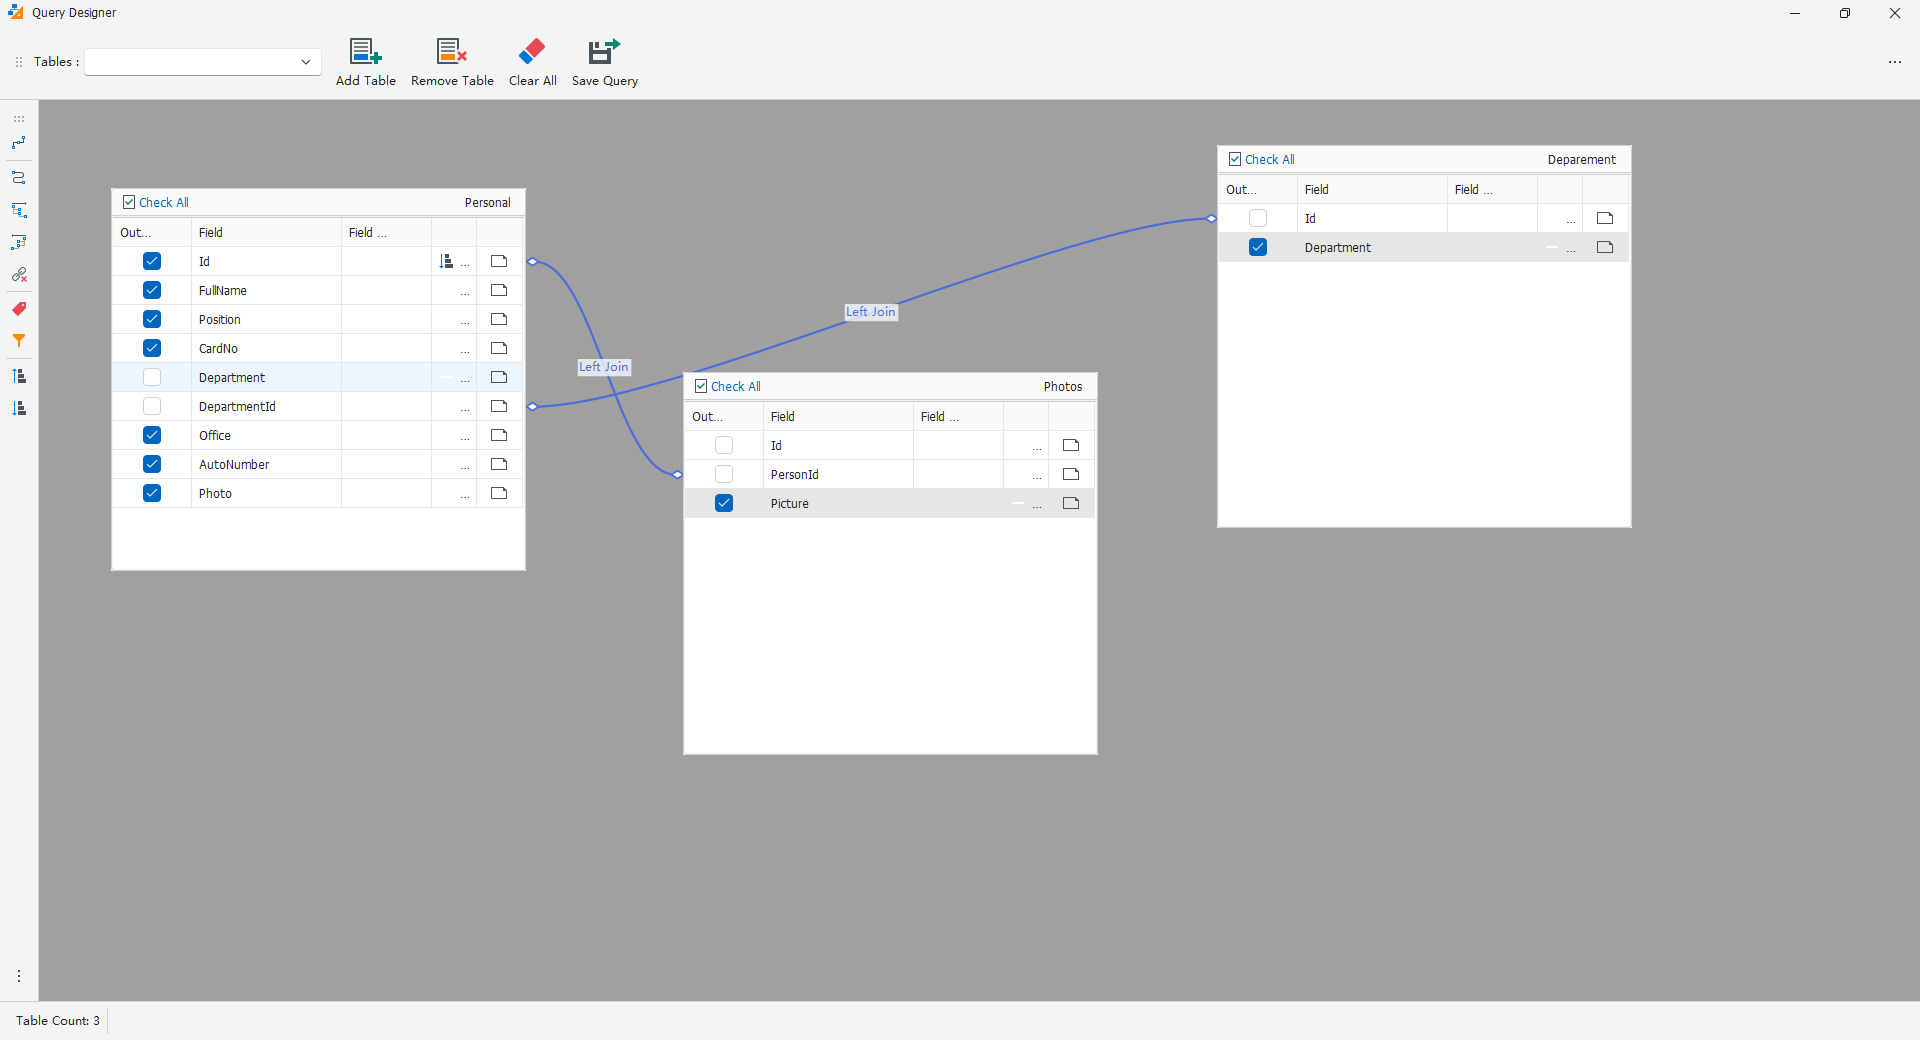
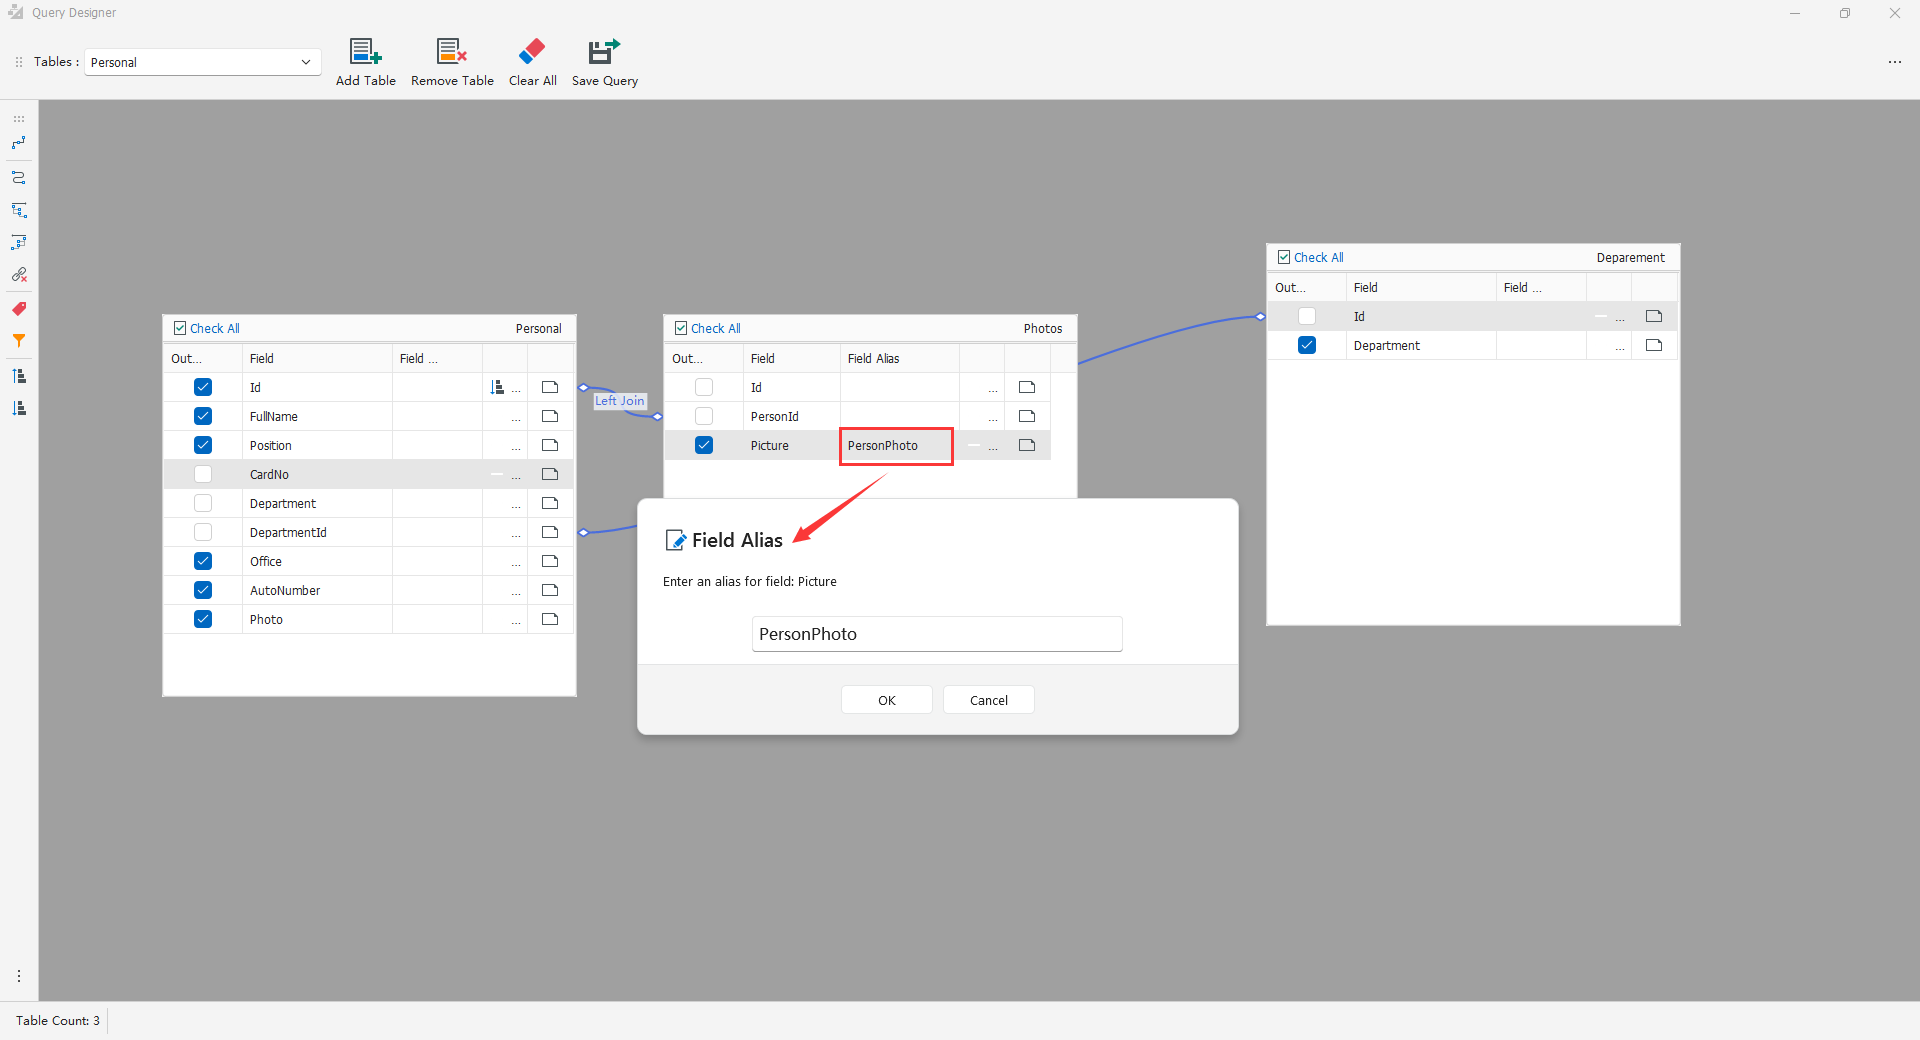
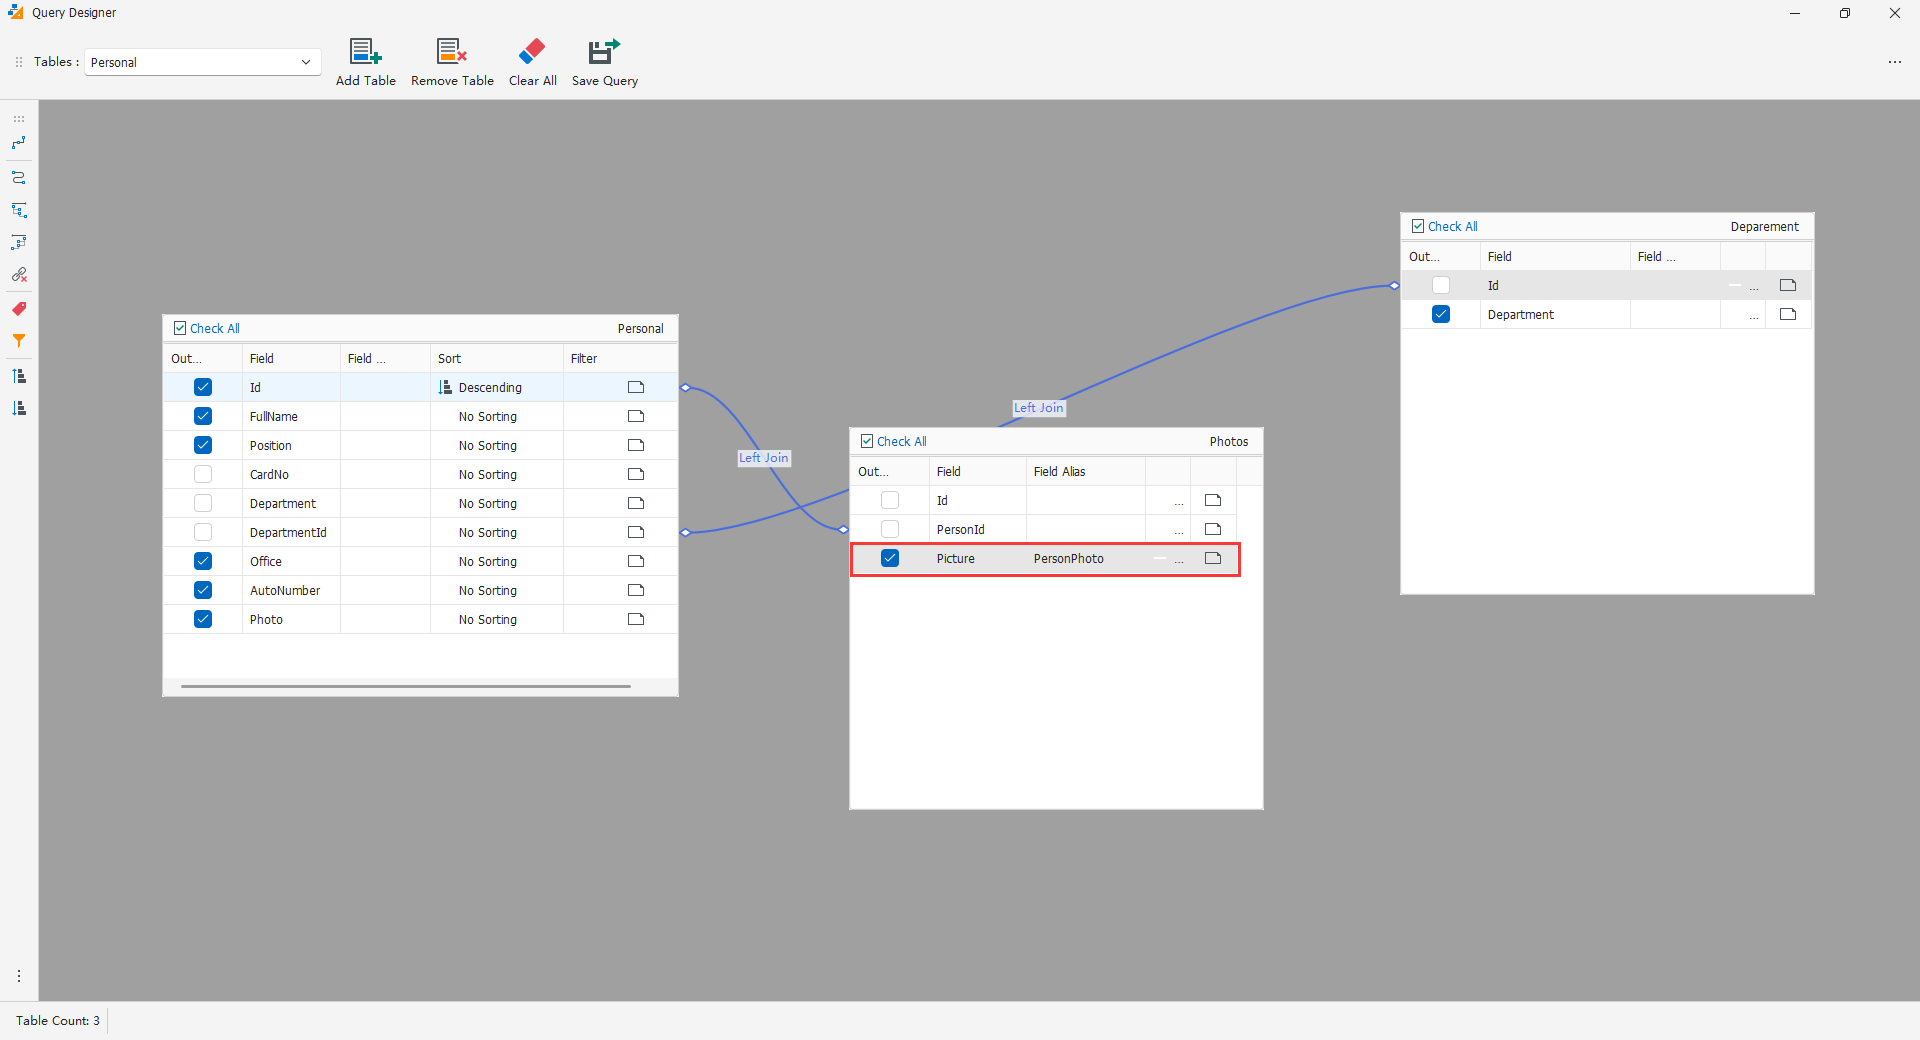
Select Output for the required keys, name, number, department name, and photo. A join/filter field need not be an output. Table-level select-all can assist inspection, but retain only necessary fields.
Added tables do not necessarily output every field. Saving checks the automatically chosen main table's recognizable primary key and may select it, so a returned result can include extra key columns. This does not supply every related table's keys or replace selection of other fields.
Select a field, use its alias menu, and enter a unique stable name, for example DepartmentName. Dynamic objects bind to output names; changing aliases requires reviewing objects, components, and reports.
Filters
Select a field and open its filter tool. Enter a condition fragment, not a complete SELECT. The tool supplies qualification and checks semicolons, statement keywords, and quote pairing. Passing input checks does not prove database compatibility.
Examples include = 1, = 'Active', LIKE 'A%', IS NULL, and IS NOT NULL; do not use = NULL. SQL text uses paired straight single quotes. Wildcard and date syntax depend on the database.
Filters on different field rows combine with AND. They are not alternatives. Cross-field OR, complex parentheses, dates, and functions require full-SQL review. Filtering an outer-joined table for a required non-NULL value can still remove the unmatched personnel records, so inspect WHERE as well as JOIN.
Sorting
Use the selected field's menu or sort column to choose ascending/descending. Sorting does not renumber people, remove duplicates, or select a current historical photo. For a stable order, retain a distinguishing key and inspect ORDER BY for multiple-field priority; table-window position does not determine it.
Save Query and Return
- Check table instances, completed lines, outputs, aliases, filters, sorting, and any unfinished join.
- Select Save Query. If key inspection or generation fails, correct it instead of assuming success.
- Confirm that the wizard's SQL text was updated, then open Data Display.
- Verify results, finish configuration, and save the whole layout.
Current-version warning: directly closing the designer without Save Query clears the returned SQL area. Preserve the original before editing and restore it if cancelling. Closing is not a way to retain the old query.
Restoring a Diagram from SQL
The designer attempts to parse tables, fields, aliases, joins, filters, and sorting. A visible diagram does not guarantee lossless round-tripping of subqueries, aggregates, expressions, complex logic, or provider-specific syntax. Preserve the original and compare semantics and results. If live structure fails to load, recognized SQL fields may still be shown; their presence does not prove connectivity.
4.5.6 SQL and Preview
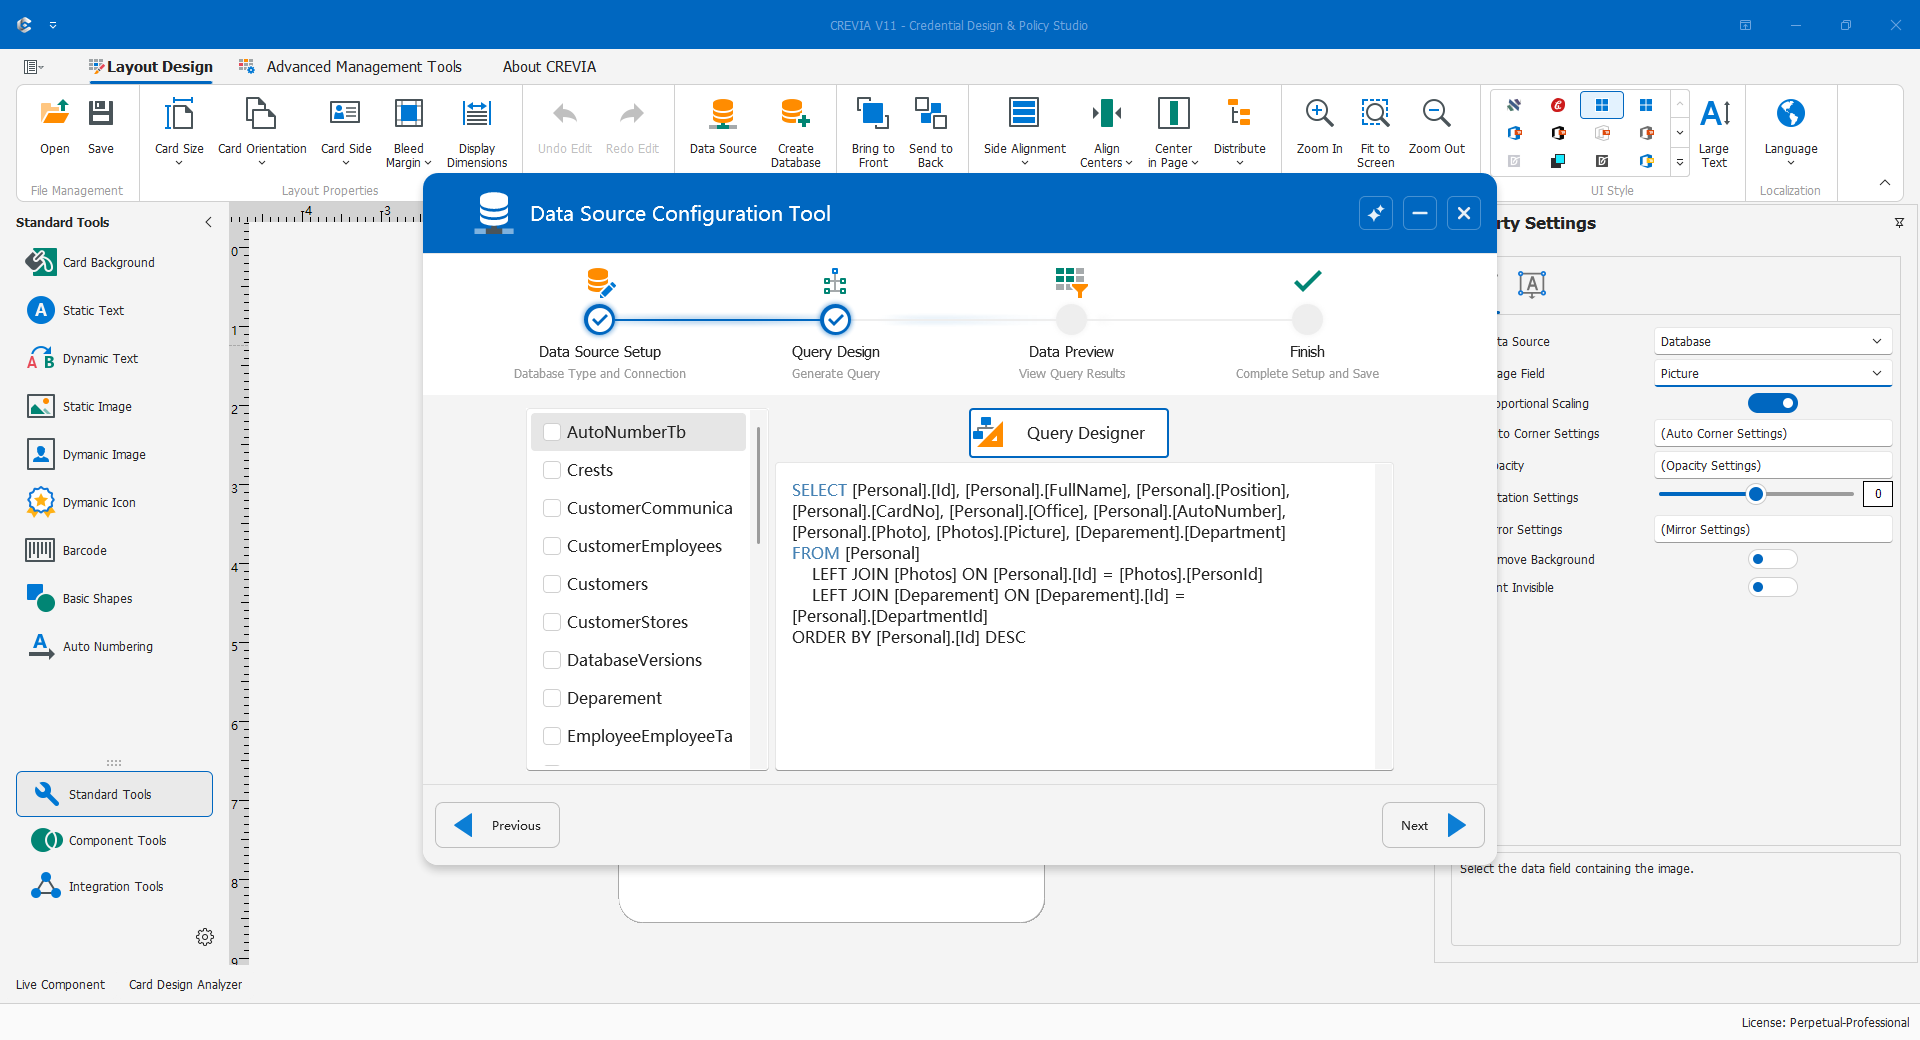
Recognize SELECT (outputs), FROM (base table), JOIN/ON (relationships), WHERE (scope), and ORDER BY (ordering). Keep the provider's identifier and syntax conventions.
The following SQLite-readable example uses fictitious English schema names to illustrate retaining people without photos. It is not a script for the language-dependent generated template:
SELECT "Employees"."ID" AS "PersonID",
"Employees"."FullName",
"Employees"."CardNumber",
"Organizations"."OrganizationName" AS "DepartmentName",
"EmployeePhotos"."Photo"
FROM "Employees"
LEFT JOIN "Organizations"
ON "Employees"."DepartmentID" = "Organizations"."ID"
LEFT JOIN "EmployeePhotos"
ON "Employees"."ID" = "EmployeePhotos"."EmployeeID"
ORDER BY "Employees"."ID" ASC
Employees is the base and the outer joins retain unmatched people with NULL related fields. Whether those people are eligible for production is a business decision. Readable SQL does not establish COC editability; verify keys and writes separately.
Partial Preview
Data Display reads the first 10 rows and identifies the view as partial. It checks structure and samples, not total population. To inspect another known record, temporarily use a precise test filter or order, then restore production scope before saving.
Check a normal record, one with a missing photo/optional value, and one with historical or multiple related records. Confirm identity, number, department, photo, NULL behavior, and intended multiplicity. Correct mismatches even if no error is displayed; do not delete original records to make counts look right.
A new empty database should still expose fields. For unexpectedly empty existing data, inspect target, filters, and joins; COC additionally requires group-SQL review. Change one condition at a time after preserving the original.
Column Order and Completion
The preview allows visible column arrangement. On proceeding to Finish, the tool attempts to reorder simple field-query outputs accordingly. Complex expressions may not follow that behavior; recheck SQL. Column order is different from record sorting.
Confirm Finish through the wizard's next-step action. Settings include connection, query, and output structure; then save or publish the whole layout. Viewing Finish or obtaining a successful preview alone does not update delivery. On failure, preserve the message and repair structure parsing or connection before distributing.
Finally open the same layout in COC with the target role. If User Group SQL exists, its result may differ from the main query. Test both rather than accepting only the administrator view.
4.5.7 Image Fields and Photo Sources
Photo display depends on storage, owner association, query output, and object binding. Distinguish image bytes from path text.
Confirm actual storage and lookup identity, verify the owner in the query, output the necessary binary or matching field, and configure the dynamic image. Test normal photos, missing photos, and inaccessible paths in both design and target operations environments.
Folder photos additionally require directory access, extensions, and naming. An old absolute path may need matching access or deliberate reconfiguration; copying files to any convenient directory is not migration. INNER JOIN may exclude people without photos, and WHERE can negate an outer join. First verify that the person's row exists before diagnosing its image object.
If all text works but images do not, inspect the image source. If all photos are identical or mismatched, inspect binding and joins. If no fields work, inspect connectivity and the overall query.
4.5.8 Common Data Configuration Problems
| Problem | Checks and response |
|---|---|
| Missing template or creation failure | Identify whether failure occurs at type confirmation, file copy, or table creation; check installation templates, directory rights, and existing files. Repair missing installation files; never overwrite an unknown business database. |
| No connection or tables | Check location, access, network, provider, and architecture. Compare paths/drivers after migration. Share redacted errors, not credentials. |
| Empty, duplicate, or incomplete results | Distinguish empty data from exclusion, inspect one-to-many history, and check Output and aliases. Do not delete records to adjust counts. |
| COC scope differs | Confirm the same layout/database, group membership, and group SQL. Priority is intended scope control, not a reason to substitute the administrator query. |
| Clicks do not join | Enable the tool, select two endpoints, and re-enable for the next line. Repeating the start cancels it; a temporary line is incomplete. |
| LEFT JOIN still loses people | Check FROM, preservation direction, and WHERE using a known missing-photo person, not canvas placement. |
| Only keys or a few fields return | Select required Output fields. Added tables, joins, and automatic primary-key selection do not output everything. |
| SQL disappears after closing | Restore the preserved SQL or redesign and Save Query. Do not complete an unintended single-table default over the old configuration. |
| SQL changes after diagram editing | Stop overwriting, compare outputs/aliases/joins/filters/order, and have complex SQL reviewed. Revalidate restored SQL on the correct database. |
Complete this section with a known database location and backup plan, required outputs and keys, valid normal/missing/multiple-related samples, clear photo sources, and target-user COC verification.